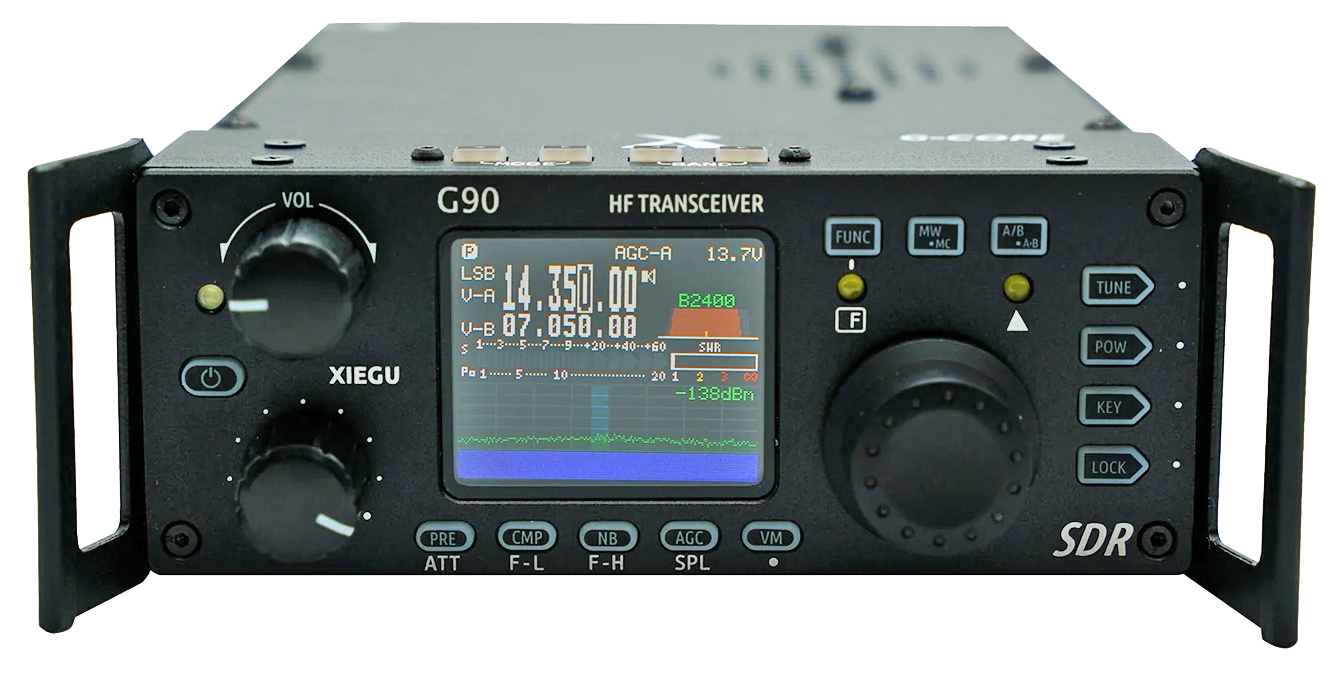
Xeigu G-90
The Xeigu G-90 HF Transceiver radio is very popular for a few reasons. It is a great little HF radio that is under $600 and it is very portable as a smaller footprint HF rig. With a max output of 20 watts this radio is great if you are on a budget. Do not underestimate the power of this radio at only 20 watts. One of my ham buddies has used this for over 6 months straight and logged over 4000 contacts both local and DX doing POTA AND FT8.
At the time of this writing the Xeigu G-90 is running $449.95.

Volume Knob - Turn to
increase or decrease the
volume. Short press to
switch to the headphone
output mode
Power Supply/Tranceiver
Indicator Light -
Standby/receiving state:
yellow-green
Transmitting state: Red
Power Switch - In the off
power state, short press to
turn on. In the power on
state, log press to shut
down the radio.
Multi-Function Adjustment
Knob - By default, turning
this knob will step at 100kHz
Pressing these two buttons
will allow you to switch
modes, i.e SSB, CW, Data,
Etc.
These two button control
and allow you to switch
bands.
Function (FUNC) Indicator:
This indicator will be on
when the second function of
the key is operated.
F Indicator: CW Mode frequency alignment indicator
Main VFO Knob - Operating
this will allow you to change
frequencies.
Press the POW button a
short time to enter power
settings state and the
function display area on the
right side of the screen will
display the POW setting
values.
ATU: There is an efficient
ATU (Automatic Tuner)
integrated in the G90S radio
to help you tune your
antenna. If you follow
what I say and use a
resonant antenna, this
becomes an obsolete
function.
The KEY key allows you to
setup your CW key in
conjunction with other
function buttons of the
radio.
Lock Button - Allows you to
lock the functions of the
radio to prevent accidentally
changing settings.
Allows you to change the
automatic gain control AND
works in conjunction with
the radio to switch from
VFO-A to VFO-B.
Pre Amp Attenuator:
Straight pass cycle
CMP / F-L: Turn it on to transmit voice compression. Digital Filter F-L, low pass cutoff frequency selection
NB / F-H Button: Noise
Blanker level, Width & Cycle
operations. Digital Filter F-H
high pass startup frequency
selection.
VM Button: Switch from
Frequency mode to Channel
mode.
Turn on memory channel function / Enter Channel Clear mode
A/B . A>B Button: Switch between VFO-A and VFO-B / Copy the current VFO to the background VFO
Press first then F indicator
will be on, then press
corresponding function key.
Press again to exit second
function and F Indicator will
turn off.

Status Display Area
Power Supply Voltage Indicator.
Mode Display - LSB, USB,
CW, Etc...
VFO Display Area -
VFO-A / VFO-B.
Multi-function indicator:
Receiving state is S Meter
(Noise Floor), Transmission
state is Power Meter.
Volume Level Indicator
Receiving Bandwidth display
SWR Meter
Receiving Level Display
Spectrogram and Waterfall
Display Area.
You will, of course, want to consult with your operating manual for a more detailed explanation of the functions of the G90, however this page will at least allow you to familiarize yourself with some of the features. If you are looking into getting a G90 as an HF rig for your shack, this will also help you out a bit and determine if you want one. I highly recommend that you find someone with a G90 and ask to play with it a bit and have them show you around the radio. They are easy to use and fun to work with at home or out in the field.
